SANDRA'S FROZEN BANANA STRAWBERRY SMOOTHIE

A perfect marriage of fruit
makes up this very satisfying
and refreshing smoothie...
Serving: (1)

Prep: 3 Mins.
Posted by Sandra

INGREDIENTS

1 *frozen and peeled banana, cut into 4 pieces
2/3 cup milk
1 (8 oz. container) strawberry yogurt

-- A straw

METHOD

Pour all ingredients into a blender, and puree for 1 minute until smooth, and serve. – enjoy!


~~~~~~~~~~~~~


*Tip: I freeze peeled, ripe bananas that I've cut into quarters in Ziploc bags. I use them often for frozen treats such as this, or for baking in recipes later on once thawed

SANDRA'S CRUNCHY YET JUICY BONELESS PORK LOIN CHOPS

A quick way to make boneless pork chops that
are crunchy on the outside,
while being super moist on the inside...
Servings: (4)
Prep. 10 Mins. |
Bake: 25 to 35 Mins.

Posted by Sandra

INGREDIENTS

4 boneless loin pork chops – ½” thick

***Coating Mixture
½ cup of italian seasoned breadcrumbs
2 tbsp. all-purpose flour

***Honey Dijon Dressing
1/4 cup mayonnaise
1 tablespoon dijon (regular or stone ground)
1 tablespoon honey
1/2 tablespoon lemon juice

METHOD

Preheat oven to 350 degrees. Line a baking sheet with foil, and then place a rack on top that has been sprayed with oil.

Place italian breadcrumbs, and flour into large ziploc bag.

In a small non-reactive bowl, whisk together the mayonnaise, dijon, honey, and lemon juice. Important: Reserve 2 tablespoons separately from main bowl, and set aside with a pastry brush, and then place original bowl covered in the refrigerator.

Brush the pork chops on both sides with the reserved honey dijon dressing, and then coat with crumb mixture while pressing firmly to adhere. Place coated pork chops on the rack atop the prepared baking sheet.

Bake for 25 to 35 minutes, until crispy and the center internal temperature reads 160 degrees, cooking time will depend upon the thickness of the pork chops.

Meanwhile, make a garden salad, and toss with the refrigerated honey dijon dressing. Remove the pork chops from the oven, and let rest for 5 minutes, and then slice into strips, and place them along side the dressed garden salad. – Enjoy!

SANDRA'S CREAMY HOMEMADE HONEY DIJON DRESSING or DIP

You'll never buy store-bought again
because you can make this fantastic
recipe that's so flavorful
and know all the ingredients within it...
Yields: (1/3 cup)
Prep. 3 Mins

Posted by Sandra

INGREDIENTS

1/4 cup mayonnaise
1 tablespoon dijon (regular or stone ground)
1 tablespoon honey (for my recipe, click here:  Sandra's Alaska Fireweed Honey - Homemade)
1/2 tablespoon fresh lemon juice

METHOD

In a small non-reactive bowl (glass or ceramic), whisk together the mayonnaise, dijon, honey, and lemon juice, until smooth and emulsified.

Cover and refrigerate any leftovers.


~~~~~~~~~~~~~~~~


Tip: Try using this instead of beaten eggs when breading meat, seafood, or poultry. Also, this is fantastic as a dip for chicken tenders, or as a dressing for garden salads, esp. when adding strips of chicken, turkey, or fish.

SANDRA'S CRUNCHY-MOIST TASTIEST EGGPLANT EVER

I have made eggplant using many methods
and this version tops them all,
it's like a meal in itself...
Servings: (4)
Prep: Stand time: 20 Mins. |
Fry/Bake: 35 to 40 Mins.

Posted by Sandra

INGREDIENTS

1 organic eggplant, peeled and sliced into ½” rounds
1 fresh lemon, juiced
Kosher salt
1 tablespoon olive oil
½ cup all-purpose flour
2 eggs, lightly beaten
¼ teaspoon cayenne pepper
1 cup dry italian breadcrumbs
½ teaspoon garlic powder
1 medium organic onion, sliced
2 organic tomatoes, sliced (or chopped)
1 tablespoon fresh organic basil, chopped
1 cup grated organic parmesan cheese
1 cup grated mozzarella cheese

METHOD

Brush the eggplant slices on both sides with lemon juice (to prevent oxidation), and sprinkle kosher salt (to remove bitterness) on both sides as well, and then place eggplant slices in a strainer over a bowl for 20 minutes,rinse and pat dry with paper towels.

Preheat oven to 350 degrees. Line baking sheet with foil, spray with oil, and set aside.

Heat olive oil in a large non-skillet over medium-high heat to par-fry eggplant, just until lightly seared. Place eggs in a shallow dish and slightly beat them with the cayenne pepper. Place the flour, breadcrumbs, and garlic powder in 2 separate ziploc bags. Dredge the eggplant slices first in the flour, in beaten eggs, and in breadcrumbs to coat. Fry coated eggplant slices in skillet, just until golden brown, about a minute per side (you may need to do so in batches). Season with kosher salt and ground pepper, to taste, and place on prepared baking sheet. In the same skillet add a bit more olive oil and saute the onions until translucent, and then layer them atop the slices of eggplant, topping them off with the tomatoes, basil, parmesan, and mozzarella.

Bake for 30 minutes in the preheated oven, until cheese is lightly browned, melted, and bubbly. – Enjoy!

~~~~~~~~~

Tip: I like to serve this dish with warm crispy baguette slices, and a fresh garden salad!

SANDRA'S TAKE-ME-AWAY CHAI TEA

I took an afternoon break
from work when
this recipe came to mind ~
Needless to say, I now often enjoy
sipping this refreshing beverage...
Yields: (4 cups)
Prep: 3 Mins. |
Cook: 4 Mins.

Posted by Sandra

INGREDIENTS

2 cups filtered water
2 generous tablespoons of loose black tea leaves
½” piece of fresh ginger, peeled
--(I keep mine in ½” pieces already peeled in the freezer)
1 whole cinnamon stick
2 whole cloves
½ teaspoon ground cardamom
1 vanilla bean split, and inner pods removed, or ½ tsp. vanilla extract
Dash freshly grated nutmeg
4 tablespoons honey (or click for: Sandra's Homemade Fireweed Honey)
2 cups milk

METHOD

In a medium saucepan, add all ingredients except milk and place over high heat just until boiling, and then reduce heat to a simmer for 3 minutes, while occasionally stirring. Add milk and heat just prior to boiling point, and remove from heat. Strain Chai Tea through a fine mesh strainer into a 4-cup glass measuring container (as it is heatproof).

Serve hot with a cinnamon stick and a pinch of cardamom, or chilled in a tall glass filled with ice and a fresh sprig of mint.


~~~~~~~~~~~~~


Tip: Refrigerate any unused Chai Tea, and then reheat via your typical method and/or froth with your cappuccino maker.

SANDRA'S MOOSE BURGER HUEVOS RANCHEROS

A great way to start your day, or for lunch or dinner
this is a wonderful meal that your family is bound to love!
Servings: (2)
Prep: 10 Mins. |
Cook: 25 Mins.

Posted: by Sandra

INGREDIENTS

½ lb. lean moose burger
--(or venison, beef, or buffalo)
1 medium yellow onion, finely chopped
1 garlic clove, minced
½ teaspoon cumin
½ teaspoon chili powder
1 jalapeno pepper, seeded and de-ribbed
1 (15 oz. can) diced tomatoes, undrained
2 tablespoons tomato paste
1/4 cup fresh cilantro, chopped; plus reserve some for garnish
1 teaspoon kosher salt
1/4 teaspoon ground pepper
canola oil
4 (6”) corn tortillas
1 (16 oz. can) refried beans
4 eggs
½ cup mexican blend cheese, grated
¼ cup sour cream
1 tomato, deseeded, juice, and chopped

METHOD

In a large skillet nonstick over medium-high heat, cook the burger while breaking it into small pieces until browned. Add the onions and cook until translucent. Add the garlic, cumin, chili powder, and jalapeno and cook for 30 seconds longer. Add the tomatoes and its juice, tomato paste, cilantro, kosher salt, and freshly ground pepper, and bring to boil, and then reduce heat to let simmer.

Meanwhile, place the refried beans in a small saucepan over medium heat to warm, while occasionally stirring.

Heat a medium nonstick skillet to low heat, and add a bit of canola oil and gently fry four eggs, cooking very low and slow so they are tender when done, gently flip over to finish cooking to your desired doneness.

Using the same skillet, brush the tortillas with canola oil. Add two corn tortillas at a time to warm, about 1 minute per side. Repeat with remaining corn tortillas.

To serve, place two warm corn tortillas on one plate, and two on another. Top the tortillas with refried beans, two eggs each, and ladle sauce over top, and then sprinkle with cheese, dollops of sour cream, chopped tomatoes, and chopped cilantro. – Enjoy!

SANDRA'S FROZEN BANANA CHOCOLATE SMOOTHIE

A very satisfying smoothie 
you can have within minutes...
Serving: (1)

Prep: 3 Mins.
Posted by Sandra

INGREDIENTS

1 frozen and peeled banana, cut into 4 pieces
2/3 cup milk
2 Lindt Lindor chocolates (any flavor)
2 tablespoons hot espresso, or strong coffee
¼ teaspoon ground cinnamon
¼ teaspoon vanilla extract

--1 french vanilla pepperidge farm creme filled pirouette rolled wafer, broke in half

METHOD

Pour all ingredients into a blender, and puree for 1 minute, just until smooth, and serve. – Enjoy!

~~~~~~~~~~~~~


Tip: I freeze peeled, ripe bananas that I've cut into quarters in Ziploc bags. I use them often for frozen treats such as this, or for baking in recipes later on once thawed.

SANDRA'S STEAMING SWEET and SMOKY SALMON CORN CHOWDER


[Yay! My photograph of this 
Sweet and Smoky Salmon-Corn Chowder
 was featured on 6-12-11 at:  
http://www.bfeedme.com/
a-craving-for-creamy-corn-chowder/]
Serves (4 to 6)
Prep: 10 mins. | 
Cook: 50 Mins. to 1 hr.


I like to finely mince veggies to make my chowders to form a flavorful broth, rather than using too much flour as a thickening agent.

Posted by Sandra

INGREDIENTS:

¼ lb. bacon, cut into ½” strips 
--(I use Jerry’s Meats double-smoked peppered brand)
1 white onion, (½ finely minced, ½ chopped)
1 carrot, scrubbed (1/2 finely minced, and 1/2 chopped)
1 russet potato, peeled (1/2 finely minced, and 1/2 chopped)
1 rib of celery with leaves (1/2 finely minced, and 1/2 chopped)
1 clove of garlic, minced
2 tablespoons all-purpose flour
Kosher salt and ground pepper, to taste
1 bay leaf
1 teaspoon old bay seasoning
3 cobs of fresh corn, husked, with kernels cut from cob (also, use the back of the knife to extract corn milk from cob onto a plate – and place the corn kernels on it as well, and set aside.)
1/2 lb. smoked salmon, kippered fillets, or jarred strips, with skin removed, and flaked
1 cup half and half
1 tablespoons fresh parsley, chopped

METHOD:

In medium heavy-bottom pot we’ll make the broth by sauteing the bacon until browned, adding the ‘minced’ veggies, and garlic, and then stirring until cooked. Sprinkle in flour and stir two minutes longer. Add some kosher salt and ground pepper, to taste, bay leaf, and old bay seasoning. (Reserve ‘chopped’ potatoes and carrots in a small bowl of cold water to prevent oxidation, and set aside.)

Add water to the pot so it is a couple of inches over veggies, (more for a soup, or less for a stew or chowder consistency).  Bring to boil, while scraping bottom to release bits, and reduce heat to low to simmer, cover,  and simmer for 30 minutes to make a nice broth (the vegetables should have nearly disappeared by then so you should now have a thickened consistency).

Add remaining ‘chopped’ veggies (but drain the water from the potatoes and carrots first), corn kernels and corn milk, smoked salmon, and simmer for 20 to 30 minutes, just until chopped veggies are tender. Check seasoning for salt and pepper, and if too thick add a bit of water at this point.

Remove pot from the heat (because we do not want the half and half to curdle when we add it next), now add the half and half, and fresh parsley. Remove bay leaf and toss.

Serve with prepared and warm french loaf slices that have been cut on the diagonal, and placed alongside your serving bowls of Sweet and Smokey Salmon-Corn Chowder. – Enjoy!

SANDRA'S LOVELY LIME and MINT WATERMELON SALSA

A very refreshing take on a salsa
I made with ingredients that
just naturally compliment each other...
Yields: (Appx. 2 cups)

Prep: 10 Mins.
Posted by Sandra

INGREDIENTS

1-1/2 cups watermelon, rind removed, seeded, and diced
1/2 cucumber, peeled, seeded, and diced
1/2 jalapeno pepper, seeded, de-ribbed, and minced
1/4 red onion, finely chopped
1 tablespoon fresh mint leaves, finely sliced
Zest and juice of 1 lime
1 teaspoon honey (for recipe, click here: Alaska Fireweed and Clover Honey - Homemade)
pinch of table salt

--Club Crackers or Tortilla Chips

METHOD

Add the watermelon, cucumber, jalapeno, onion and basil in a medium-sized nonreactive bowl, and gently fold to combine.

In a small bowl, combine the lemon zest, lemon juice, honey, table salt, and whisk to combine, and then add to salsa mixture in medium bowl, folding to combine.

Chill for a minimum of 30 minutes for flavors to meld, and then drain excess liquid, if desired.

Serve in a decorative non-reactive ceramic or glass bowl, with Club Crackers for scooping. – Enjoy!


~~~~~~~~~~~~~~~~


Tip: This is also very refreshing to serve as a side with many variations of fish dishes, esp. halibut – oh...and pork as well ;-)   Some also like to eat this Lovely Lime and Mint Watermelon Salsa with tortilla or pita chips.

SANDRA'S HAWAIIAN SPAM MUSUBI

Even those with the most delicate palettes
will devour this 

epic Hawaiian Spam Musubi...
Yields: (4 Sushi Rolls = 16 total pieces)
Prep: 5 Mins. |
Cook 8 to 10 Mins.

INGREDIENTS

***Hawaiian Spam Musubi
1 (7 oz. can = half size) of Spam
3 cups uncooked sushi rice (click here for recipe at:  Sandra's Easy Sushi Rice)
1 tablespoons low-sodium soy sauce

***Glaze
1 tablespoon sugar
1 tablespoon rice vinegar
2 regular-sized nori sheets, cut in half lengthwise

--*1 bottle of furikake (usually found on the Asian isle in the market, or at an Asian store)
--*musubi-maker (see tip below)

--Scissors and sharp knife

***Sauce
1/4 cup mayonnaise
1 teaspoon lemon juice
1 teaspoon furikake (see tip below)

METHOD

Prepare sushi rice about 1.5 hours before you will need it, as it needs time to cool down completely and absorb the sushi sauce before you roll it into your Spam Musubi. Also, make the Dipping Sauce by mixing the ingredients in a small bowl, and place in refrigerator to let flavors to meld.

Assembly-line process...
Meanwhile, start an assembly line on work surface to form Spam Musubi by slicing the Spam into 4 even pieces, and set aside. Using scissors, cut 2 nori sheets lengthwise in half, and stack them, and then set aside. Open your furikake seasoning, and set aside. Place room temp water in a small bowl, and set aside.

Mix soy sauce, sugar, and rice vinegar in small bowl, including a plate to place the cooked spam on, and set both of these aside by stove.

Begin assembling in this method...
Heat a large nonstick skillet to medium heat. Place the slices of spam in the skillet, and sear undisturbed, while only turning once, until they are crispy golden brown. Pour the soy sauce mixture over the spam in the skillet and quickly saute, just until the sauce evaporates and caramelizes, and then transfer the spam slices to a plate.

Nearly finished assembling...
To assemble, lay a damp paper towel folded in half down on work surface, and lay a half of a nori sheet (non-shine side up) over it, and then place the musubi-maker with the inside moistened with water (without the lid) crosswise over the middle of the nori sheet.

Use a small spoon to place cold sushi rice into the moistened mold, filling about 1/2 full with sushi rice. Use the musubi-maker handle (with the bottom moistened) to firmly press down on rice.

Spread with a layer of sauce.

Sprinkle with a thin layer of furikake; lay a slice of spam atop, and then sprinkle another thin layer of furikake, and another layer of pressed rice until it is level with the top of the mold--pressing firmly with the moistened musubi-maker handle one final time. Hold the handle down with one hand and use the other to pull the mold upward to unmold the Span Musubi.

Fold one half of nori flap on top, moisten other edge of flap, then quickly, while tightly wrapping the nori around the rice to form a tight square shape; press gently to adhere.

Repeat 3 more times, forming 4 total square sushi logs.

With a sharp knife, cut each roll crosswise in half, then in half again to form 4 equal squares. Plate and serve with remaining sauce on the side for dipping. ~ Enjoy!

Finished assembling,
and ready to slice
(as shown in main top photo above)...
~~~~~~~~~~~~~~~~~~

Tips: 

To store leftovers, tightly wrap each Spam Musubi roll individually in plastic wrap and store in refrigerator, and then to re-heat just place in microwave for a few seconds. 

Some also prefer to fry the outside of the nori rolls before serving them in slices if they have been previously refrigerated.

I purchased the small Musubi Maker and Furikake seasoning at:
http://www.amazon.com/Spam-Musubi-Sushi-Press-K5SPS/dp/B000FWOB5S/ref=pd_sim_k_1): Once on the site, they now have them in different colors, bonus!

However, some simply use the spam can for molding Spam Musubi, which is another option.

Now, there's a large Musubi Maker here: http://www.ghco.us/index.php/large-single-acrylic-press-spam-musubi-non-stick-sushi-maker.html

SANDRA'S EASY SUSHI RICE

I probably have made 15 iterations
and this one finally works for me, every time...
Yields: (3 cups)
Prep: 5 Mins. |
Steam: 35 to 45 Mins.

INGREDIENTS

***Steamed Rice
3 cups water
1-1/2 cups short grained rice
½ teaspoon kosher salt
½ teaspoon vegetable oil

***Sushi Sauce
1-1/2 tablespoons rice vinegar
1-1/2 tablespoons lemon juice
1-1/2 tablespoons sugar

METHOD

Prepare sushi rice about 1.5 hours before you will need it, as it needs time to cool down completely before you roll it into your sushi.

Add Steamed Rice ingredients in a rice cooker, and press cook. Otherwise, boil water in heavy bottom medium-sized saucepan, add the rice, and then cover and reduce heat to simmer, until rice is tender – about 30 to 40 minutes, depending on brand used.

While rice is cooking, in a small saucepan combine vinegar, lemon juice, sugar, and salt. Bring to a boil. Reduce heat and simmer, just until sugar is dissolved. Remove from heat.

As soon as rice is done, pour vinegar mixture over rice, while fluffing with a fork. Cover and let stand to let liquid absorb into rice, and let it cool completely.

When the rice has cooled, you are ready to make the sushi of your choice. Place a sheet of nori (non-shine side up) onto a slightly damp tea towel, and layer with rice and veggies, seafood, etc. – roll up and enjoy!

SANDRA'S ROASTED ASPARAGUS SOUP with GREMOLATA

A perfect first course...
Servings: (2)
Prep: 5 Mins. |
Roast: 30 to 35 Mins. |
Cook 3 Mins.

Posted by Sandra

INGREDIENTS

***Gremolata
1 tablespoon parsley, finely chopped
1 teaspoon lemon peel, grated
1 small garlic clove, grated
2 tablespoons olive oil
Kosher salt and ground pepper, to taste

Asparagus, onions, and garlic
ready for roasting
***Roasted Asparagus Soup:
1 bunch size pinky-sized asparagus, cut into 2” pieces
1 medium white onion, peeled and cut into wedges
1 garlic clove, cut in half lengthwise
1 tablespoon olive oil
½ cup heavy cream
½ cup low-sodium chicken broth
Kosher salt and ground pepper, to taste

METHOD

Preheat oven to 350 degrees. Line a baking sheet with foil, and set aside. Whisk together gremolata ingredients in a small bowl, and set aside as well.

Finished roasted asparagus,
onion, and garlic
Add asparagus, onions, and halved garlic clove pieces to a medium bowl, and toss with 1 tablespoon olive oil. Place on prepared baking sheet. Sprinkle with kosher salt, and ground pepper, to taste. Roast for 30 to 35 minutes while using tongs to toss every 10 minutes, while roasting. Roast just until asparagus pieces are crisp-tender and slightly browned, and onions and garlic begin to caramelize.

Carefully add hot vegetables to blender using tongs. Add ½ cup heavy cream, ½ cup chicken broth, and puree until smooth. Transfer to medium saucepan, and warm soup over medium heat; thinning with more broth, if need be. Taste for seasonings, adding additional kosher salt and ground pepper to taste, if necessary.

Ladle soup into bowls, and drizzle with gremolata; serve hot, warm, or cold. – Enjoy!


~~~~~~~~~~~~~~


Tip: I like to serve this soup with a warm french baguette that I bake along with the roasted veggies. Also, if you are using thicker asparagus you’ll need to increase the roasting time.

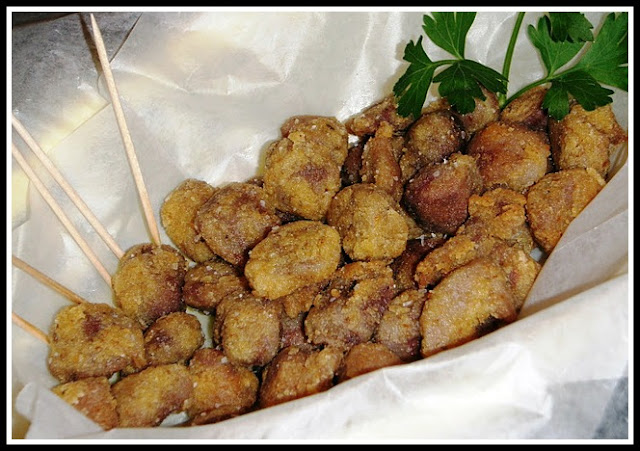
SANDRA'S CRISPY TENDER CHICKEN GIZZARDS

This is an adaptation of the chicken gizzards
I often eat while at Pikes Place Market in Seattle
~  It works fantastically...
Servings: (2)
Prep: Pre-boil – 1 hr. |
Fry: 1 to 2 Mins.

Posted by Sandra

INGREDIENTS

***Pre-Boil Gizzards
1 lb. fresh chicken gizzards
¼ teaspoon onion powder
¼ teaspoon garlic powder
¼ teaspoon fine-grained kosher salt
pinch of freshly ground pepper

***Dredging/Frying
1 egg, slightly beaten
¼ teaspoon filtered water
Pinch of cayenne

3 tablespoons all-purpose flour
3 tablespoons italian bread crumbs
½ teaspoon paprika

Peanut oil for frying

***Season Gizzards
1 teaspoon cornstarch
¼ teaspoon onion powder
¼ teaspoon garlic powder
¼ teaspoon old bay seasoning
¼ teaspoon fine-grained kosher salt
Pinch of freshly ground pepper

--Toothpicks for serving

METHOD

Trim excess gristle from chicken gizzards. Rinse under cold running water. Place gizzards in a medium saucepan, and then just cover them with cold water, and then add the boil seasonings. Bring to a boil, reduce heat to a simmer and pre-boil ‘covered’ for 1 hr.

Cooling par-boiled gizzards


Strain the gizzards,
and spread out to dry on a paper towel lined plate, and let cool.


Meanwhile, add 1” of oil in an electric skillet or dutch oven and heat to 350 degrees. In shallow bowl, beat the egg, water, and cayenne. In large Ziploc bag, add the flour, breadcrumbs, and paprika; mixing to combine.

Once the gizzards are cool, place in a medium bowl, and toss with cornstarch, onion powder, garlic powder, old bay seasoning, kosher salt and ground pepper.

Dip the gizzards in the egg mixture, and then drop into the ziploc bag with the breading mixture. Shake the bag thoroughly to coat gizzards, and shake off excess.


Perfect lightly browned and
crisp-tender
chicken gizzards


Gently lay the coated gizzards in the hot oil using a slotted spoon (or 'spider'. Cook for just a couple of minutes, until golden brown and crispy. Remove with slotted spoon (or 'spider') to a paper towel-lined plate to drain, and lightly sprinkling with kosher salt while hot.

Serve hot gizzards in a bowl lined with waxed paper; plus toothpicks to spear and eat as an appetizer –

Enjoy!


SANDRA'S INCREDIBLE INDIVIDUAL SCALLOPS GRATIN

You'll want to savor every 
single succulent bite...
Individual Servings: (4)
Prep: 5 Mins. |
Bake: 5 to 7 Mins.

Posted by Sandra

INGREDIENTS

***Alaska Bay scallops:
2 pounds bay scallops
½ teaspoon garlic powder
½ teaspoon onion powder
½ teaspoon old bay seasoning
2 tablespoons butter, melted
1 tablespoon lemon juice

***Gratin:
2 tablespoons italian seasoned breadcrumbss
2 tablespoons canned french fried onions, finely chopped
2 tablespoon parmesan cheese, grated
2 tablespoons butter, melted
1 teaspoon lemon juice
¼ teaspoon garlic powder
¼ teaspoon kosher salt
¼ teaspoon ground pepper
1 tablespoon fresh parsley, chopped
¼ teaspoon paprika

***Garnish:
--lemon wedges

METHOD

Preheat oven to 425 degrees. Butter 4 individual ovenproof gratin dishes, and set aside.

Rinse scallops, and thoroughly pat dry with paper towels. Place scallops in 4 prepared gratin dishes in a single layer. Combine the remaining ingredients in a small bowl, and brush over scallops. Combine the gratin ingredients in another small bowl, and sprinkle atop scallops. Lightly sprinkle each with fresh parsley, and paprika. Bake for 5 to 7 minutes, just until gratin topping starts to turn golden and scallops are opaque-do not overcook. Remove from oven, and place hot gratin dishes on 4 individual heatproof plates, with lemon wedges. – Enjoy!


~~~~~~~~~~~~~~~~~


Tips: I served mine with toasted and lightly buttered whole-wheat triangles, and a slice of watermelon along side for dessert ;-)  I too sometimes substitute out the french fried onions, with two strips of freshly browned crispy bacon broken into crumbles.


Also, if you are using larger 'sea' scallops, increase baking time to 10 to 12 minutes.

SANDRA'S TENDER GINGERSNAP COOKIES

These are great to make ice cream sandwiches with – children love helping, 
including just eating them by dipping these Gingersnaps 
in an ice cold glass of milk...
Yields: (3 doz.)
Prep: 10 Mins. |
Chill Dough: 1/2 hr. |
Bake: 10 to 12 Mins.

Posted by Sandra

INGREDIENTS

3/4 cup unsalted butter, melted
1 cup dark brown sugar
1 large egg
1/4 cup molasses
1 teaspoon vanilla extract
2 cups all-purpose flour, sifted
1 teaspoon baking soda
1/4 teaspoon fine-grain kosher salt
1-1/2 teaspoon ground cinnamon
1/2 teaspoon ground cloves
1 teaspoon ground ginger
¼ teaspoon ground allspice
--1/2 cup granulated sugar, mixed with 1 teaspoon cinnamon (for rolling cookies in)

METHOD

In a medium bowl, with a hand mixer beat together the melted butter, brown sugar and egg until smooth. Add molasses and vanilla, and beat to combine. Sift through a sieve into the bowl the flour, baking soda, kosher salt, cinnamon, cloves, ginger and allspice; blend with a wooden spoon into the molasses mixture. Place dough, covered with plastic wrap, in the freezer to chill for a 1/2 hour.

Meanwhile, preheat oven to 350 degrees. Line a baking sheet with parchment paper or use a Silpat liner; set aside.

Mix white sugar and cinnamon in a small bowl; set aside.

Remove chilled dough from freezer, and roll into walnut sized balls, and then roll them in the sugar-cinnamon mixture. Place cookies 2 inches apart onto prepared baking sheet, and slightly flatten them with a smooth-bottom glass.

Bake for 10 to 12 minutes, just until tops are beginning to form cracks. Cool on wire racks. – Enjoy!

~~~~~~~~~~~~~~~~~~~

Tip: I store my cookies in an airtight container with an unflavored cracker (I use a chunk of pilot bread or a club cracker), which keeps them moist so they don’t dry out and become hard.

CARAMEL CUSTARD with FRESH RASPBERRIES and CREAM

A decadent recipe that is oh so satisfying
(pictured is the unmolded and plated version)...


Servings: (4)
Prep: 25 Mins. |
Bake: 60 Mins. |
Cool completely
before serving in refrigerator,
or overnight

1 cup granulated sugar (for caramel)
3 whole eggs; plus 2 egg yolks, slightly beaten
1/4 cup granulated sugar (for custard)
1 teaspoon vanilla extract
Pinch of freshly ground nutmeg
1/8 teaspoon fine-grain kosher salt
2-1/2 cups heavy cream

Garnish:
--Fresh Raspberries
--Freshly whipped cream (for homemade, click here: Sandra's Perfect Whipped Cream )
--A dusting of sifted confectioners’ sugar

Preheat oven to 350 degrees.

Heat 1 cup sugar in heavy stainless steel saucepan over low heat, stirring constantly, just until sugar is melted and a light golden brown. Divide sugar syrup amongst 4 ramekins while tilting them to coat the bottom of each.

Before un-molding and
 serving in ramekin is another option
Heat heavy cream in a small saucepan to very warm, but not to the boiling point, and set aside.

In a medium bowl, whisk eggs with 1/4 cup sugar until light and frothy, and add the vanilla and nutmeg while whisking just to combine. Gradually drizzle in very warm heavy cream. Gently and very slowly pour equal amounts of custard mixture over caramel in ramekins.

Place ramekins in a 13”x9”x2” baking pan, and pour hot tap water into pan so it is half way up the outside of ramekins.

Bake for 60 minutes. Carefully remove ramekins from water with an oven mitt, and cool on wire rack for 30 minutes. Cover and refrigerate until completely cool before serving, or up to 48 hours.

To serve, un-molded, carefully loosen side of custard with knife, and flip over onto decorative dessert dish, shaking gently to loosen custard and let caramel run down sides of custard forming a sauce. Top with each dessert with a dollop of whipped cream, sprinkle with raspberries, and finally a dusting of confectioners' sugar – Enjoy!

~~~~~~~~~~~~~~~

Tip: I generally make these one day before I plan to serve them, and refrigerate overnight.


SANDRA'S PERFECT WHIPPED CREAM

This a no-fail, quick, and 
easy recipe to master...
Yields: (Slightly over 1 cup)
Prep: Appx. 5 Mins.

Posted by Sandra

INGREDIENTS

1 cup heavy whipping cream
3 tablespoons confectioners' sugar
1/2 teaspoon vanilla extract

METHOD

Chill a small mixing bowl and beaters in the freezer for 30 minutes. Add the cream to the bowl and beat until it begins to thicken. Add the powder sugar and vanilla, and continue to beat until soft peaks form. – Enjoy!

SANDRA'S CRAZY-GOOD CHEATER MINI PIZZAS

A super quick snack, 
or a lunch or dinner option...
Serving: (1)
Prep: 3 Mins. |
Broil: 2 Mins.

Posted by Sandra

INGREDIENTS

1 whole wheat hamburger bun, split in half
1 tablespoon pizza sauce (For recipe, click here: Homemade Pizza Sauce)
8 pepperoni slices
2 tablespoons mozzarella cheese, shredded
pinches of Italian seasoning herb blend

METHOD

Preheat oven to broil. Line a baking sheet with tin foil, and set aside.

Split the hamburger bun in half, and toast in toaster until lightly brown. Spread 2 teaspoons of pizza sauce over each, and then layer each with four slices of pepperoni, and top with 1 tablespoon of shredded mozzarella cheese.

Place on baking sheet, and broil for about 2 minutes, until cheese is melted and lightly brown – Enjoy!


~~~~~~~~~~~~~~~~~


Tip: I always have assorted shredded cheeses I purchase in bulk, and then break down and store in small freezer Ziploc bags, including pepperoni, salami, and prosciutto. This way, I always have the makings for quick snacks or lunch fixings on hand.

SANDRA'S HOMEMADE PIZZA SAUCE

After many different attempts 
to make the perfect pizza sauce,
this one's a keeper!
Yields: (Appx. 3 cups)
Prep: 5 Mins. |
Cook: 25 Mins.

Posted: by Sandra

INGREDIENTS

3 tablespoons olive oil
1 onion, diced
3 cloves of garlic, chopped
½ teaspoon red pepper flakes
1 teaspoon dried oregano
2 (14.5 oz. cans) crushed tomatoes
2 tablespoons roughly chopped fresh basil
Pinch of granulated sugar
Kosher salt and freshly ground pepper, to taste

METHOD

Heat the olive oil in a medium skillet over medium-heat, add the onions and saute until translucent, about 3 minutes. Add the garlic, red pepper flakes, and oregano, and then saut̩ for 2 minutes. Stir in the crushed tomatoes, and basil, and sugar. Season with salt and pepper to taste, reduce heat to low and simmer for 15 minutes. Remove and let cool to room temperature before spreading on pizza crust РEnjoy!

SANDRA'S MOOSE BURGER SPANISH BROWN RICE

This is one hearty meal ~ 
What I consider comfort food...
Servings: (10 as a side, or 6 as an entree)
Prep: 5 Mins. |
Cook 15 Mins.

Posted by Sandra

INGREDIENTS

2 strips of bacon
1 lb. lean ground burger, (I used venison)
½ teaspoon garlic powder
½ teaspoon onion powder
1 teaspoon dried cilantro
2 green onions, sliced
1 rib of celery, diced
¼ cup of frozen corn, thawed
1 (15 ounce) can tomato sauce
½ of a (10.5 oz. can) of rotel with tomatoes and chilies, drained
1/2 teaspoon yellow mustard
1 teaspoon worcestershire
1/2 teaspoon sugar
3 cups of cooked brown rice
kosher salt and ground pepper to taste

METHOD

Heat a large nonstick skillet to medium heat, and brown the bacon, until crisp. Reserve drippings in skillet, and then set aside bacon on a paper towel-line plate (crumble when cool).

Add the burger to the hot skillet with drippings, and brown. Add the garlic powder, onion powder, and dried cilantro, and stir to combine. Add the celery, and green onions; cooking for 1 minute more. Add the corn, crumbled bacon, tomato sauce, drained rotel, mustard, worcestershire, and sugar, tossing to combine. Add the cooked brown rice and fold until all the ingredients are evenly distributed. Taste for seasonings, adding kosher salt and ground pepper, if need be. Cook just until the brown rice is heated through, and serve – Enjoy!

~~~~~~~~~~~~~~~~~


Tip: You might contemplate using the remaining ½ can of rotel in an omelet -- or making it into a dip by mixing the ½ can of rotel with a ½ cup of sour cream! (Or you can just use the whole can of rotel if you'd like the Spanish Rice spicier ;-)

SANDRA'S CREAMY CLAM DIP with LIGHT RYE WASA CRACKERS

A very, very satisfying and tasty
clam dip that you're 

bound to adore...
Servings: (6 to 8)
Prep: 5 Mins. |
Stand time: 15 Mins.

INGREDIENTS

1 (8 oz.pkg.) cream cheese, at room temperature
½ cup sour cream
1 (6.5 oz. can) minced clams (I prefer Snows)
----drained (while reserving some juice depending upon desired consistency)
¼ teaspoon seasoning salt (I prefer Johnny’s Seasoning Salt)
¼ teaspoon freshly ground pepper
¼ teaspoon garlic powder
¼ teaspoon onion powder
¼ teaspoon old bay seasoning
½ teaspoon worcestershire sauce
½ teaspoon freshly squeezed lemon juice
¼ teaspoon paprika

--Garnish with 1 teaspoon freshly chopped Italian parsley

--1 pkg. of wasa light rye crackers (see photograph)

METHOD

Place cream cheese and sour cream in a medium bowl; whisking until smooth. Add the remaining ingredients, except parsley, and continue to whisk until combined. Cover and let stand at room temperature for 15 minutes for flavors to meld. Check consistency, adding more clam juice if desired, and place Clam Dip in a smaller decorative serving bowl, then sprinkle with freshly chopped parsley.  Place in center of a large platter, and line outer parameter with light rye wasa crackers, including a few table knives for spreading Clam Dip on crackers. – Enjoy!

~~~~~~~~~~~~~~~~~~~~~~~~~

Tips: You can also make this into a crab dip by replacing 8 oz. of broken lump crab for the clams. Also, many people love to eat this Clam Dip with ruffle potato chips, and it gets tastier the next day.

SANDRA'S BREAKFAST BURGERS TO GO


My photograph of this recipe was 
featured on September 10, 2011 
Yields: (2)
Prep: 2 Mins. |
Cook 10 Mins.
Posted by Sandra

INGREDIENTS

2 potato buns, toasted
4 slices of bacon, cut in half
1 teaspoon jarred sun-dried tomatoes, finely chopped
1 green onion, sliced
2 eggs, beaten
kosher salt and ground pepper to taste
2 teaspoons fresh parsley, chopped
2 cheddar cheese, slices
2 teaspoons chipolte mustard
2 teaspoons mayonnaise

METHOD

Heat a nonstick skillet over medium heat, and add bacon, cooking just until crisp and brown. Remove to a paper-towel lined plate to drain, and set aside. Reserve 1 teaspoon of drippings, and toss into skillet the sun-dried tomatoes and green onions, sautéing for 30 seconds. Reduce skillet to low, and mix the parsley, kosher salt and ground pepper to taste to the beaten eggs. Add the egg mixture to the skillet, tossing to combine

Meanwhile, place the buns in the toaster to lightly brown. On one side of the toasted bun, spread lightly it with mayonnaise, and the other with chipolte mustard. Add the egg mixture on top, and 4 half-slices of bacon over each. Add a slice of cheddar cheese on to of them, and place other half of bun on top – cut Breakfast Burgers in half, and then serve on the go. – Enjoy!


~~~~~~~~~~~~~~~~~~~


Tip: I sometimes change out the bacon for ham, and the cheddar for swiss cheese, which is yummy as well!

MAX’S FAMOUS SHRIMP PASTA SALAD

When Max makes his famous shrimp pasta salad,
there is never any left as it is one of the
first side dishes people tend to gravitate to...
Servings: (6 to 8)
Prep: 10 Mins. |
Cook: 15 Mins.

Posted by Max via Sandra

INGREDIENTS

½ lb. elbow pasta, cooked and cooled
--(Max prefers Barilla due to the ridges in the macaroni)
½ lb. cooked cocktail shrimp
--(Max gets his at SuperBear)
5 eggs, hard-boiled, peeled and chopped
2 ribs of celery, chopped
6 radishes, thinly sliced
3 green onions, sliced
2 tablespoons chopped hot and sweet pickle slices
--(Max prefers Snacker brand)
1 small can of sliced black olives, drained
1 cup mayonnaise
--(more or less to your desired moistness)
1-1/2 tablespoons dijon mustard
1-1/2 tablespoons red wine vinegar
½ teaspoon old bay seasoning
½ teaspoon garlic powder
½ teaspoon onion powder
½ teaspoon paprika
2 tablespoons fresh parsley, chopped
½ teaspoon kosher salt
½ teaspoon freshly ground pepper

METHOD

Cook pasta according to package directions.  Drain in colander while running cold water over noodles to quickly cool.  Pour drained pasta in a large bowl, and add the remaining ingredients.  Gently fold to combine. Let stand, covered, for a minimum of 1 hour in refrigerator for flavors to meld. After one hour, taste for seasonings, and add additional kosher salt and freshly ground pepper, if needed. - Enjoy!

LinkWithin

Related Posts Plugin for WordPress, Blogger...